
Key Takeaways
-
Identify the perfect location for your PolyClear Dome with ease.
-
Understand the importance of sunlight, shading, and soil conditions.
-
Ensure easy access and consider your dome’s proximity to your home.
-
Prepare the site properly for a long-lasting and efficient dome setup.
-
Navigate zoning laws to stay compliant with local regulations.
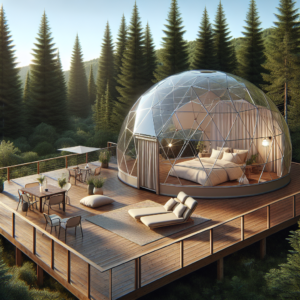
Imagine stepping into your backyard and being greeted by a thriving garden, shielded and magnified within a gleaming PolyClear Dome. The dream of cultivating your own lush oasis can be a reality, but first, you need to pinpoint the ideal spot for your dome. Let’s dive into the essentials of site selection, ensuring your garden not only survives but thrives.
My Favorite Geodesic Domes for Eco-Homes & Glamping
Why I Recommend Them: Geodesic domes offer versatile solutions for sustainable living and glamping. Whether you’re looking to set up an eco-home, a glamping site, or a unique living experience, top brands like Ekodome®, Pacific Domes, and Hypedome provide durable, energy-efficient, and aesthetically pleasing options that blend seamlessly with nature.
Click here to explore the best geodesic domes for your eco-home or glamping site!
Choosing the Optimal Spot for Your PolyClear Dome
So, you’ve decided to embark on the exciting journey of installing a PolyClear Dome. Congrats! The first step is crucial: selecting the right spot in your backyard. This isn’t just about picking a place that looks nice; it’s about finding a location that complements the purpose and functionality of your dome.
First things first, consider the lay of the land. You’ll want a spot that’s relatively flat to minimize the work needed to level the ground. Also, think about what’s beneath the surface. Are there any buried cables or pipes you need to be aware of? Safety first!
Now, let’s talk about what’s above ground. Keep an eye out for overhanging branches or structures that could pose a risk to your dome. Falling debris during a storm is no joke, and the last thing you want is a damaged dome or, worse, damaged dreams of that perfect garden.
-
Flat terrain to ease installation.
-
Awareness of underground utilities for safety.
-
Clearance from overhanging hazards to protect your dome.
When you’re walking around your backyard, trying to find that sweet spot, remember to look up and around. The right location is not just about the ground; it’s about the entire environment that will encompass your PolyClear Dome.
Key Considerations for Selecting a Site
Before you get too carried away dreaming about your future green haven, let’s ground ourselves in some practical considerations. The right site for your dome will tick off several boxes on our checklist.
Firstly, think privacy. Your dome is your sanctuary, so choosing a spot away from prying eyes can make all the difference. Secondly, reflect on the aesthetics. The dome should complement your backyard, not clash with it. And lastly, consider the future. Will there be any major landscaping changes that could affect your dome? Planning ahead is key.
Remember, this is more than just a garden; it’s an extension of your home. So, it’s worth taking the time to choose a site that aligns with your vision and practical needs.
-
Privacy for a peaceful retreat.
-
Aesthetics that enhance your backyard’s beauty.
-
Future landscaping plans to avoid disruptions.
Think of your PolyClear Dome as a piece of art. Just as a painter carefully selects the right canvas, you too must choose the right backdrop for your masterpiece. It’s a balance of practicality and vision.
Evaluating Sunlight and Shading
Light is essential, especially when creating an optimal environment. The right amount of sunlight is crucial, so you’ll want to choose a spot that gets plenty of rays. But not too much! Too much direct sunlight can lead to overheating, especially in the summer months.
Observe your backyard at different times of the day to see how the sun moves across the space. Look for a location that gets a healthy dose of morning light but is shielded from the harsher afternoon sun. This balance will help maintain a comfortable environment without focusing solely on plant growth.
It’s not just about the sun, though. Consider the shading from nearby trees or structures. A little shade can be beneficial, but too much can impact the overall environment. It’s all about finding that perfect harmony.
-
Ample morning sunlight for creating an ideal environment.
-
Protection from intense afternoon sun to prevent overheating.
-
Strategic shading to maintain a balanced atmosphere.
As you evaluate potential spots for your dome, imagine the sun as a spotlight, highlighting the star of the show—your outdoor space. You want that spotlight to be just right, not too dim, not too bright.
Understanding Soil and Terrain Dynamics
The foundation of any outdoor space is, quite literally, the soil. It’s the basis of your environment, so getting to know the dirt beneath your feet is crucial. Is it clay-heavy, sandy, or loamy? Each type has its pros and cons, and understanding this will guide your overall strategy.
If you’re not a soil expert, no worries! Simple tests can reveal a lot about your soil’s composition and pH level. And if the soil isn’t ideal, don’t fret. Raised beds or soil amendments can turn even the most stubborn dirt into versatile outdoor space.
Then there’s the terrain. A slight slope can actually be beneficial for drainage, but too much incline can make installation a nightmare. Look for a happy medium where water can drain away without taking your soil with it.
-
Soil type knowledge for informed outdoor planning.
-
pH testing to understand soil characteristics.
-
Drainage-friendly terrain without excessive slope.
Thinks of your outdoor space like a blank canvas, and the soil is its starting point. Your goal is to set up a great environment that works well for different purposes. This is where you set things up to make your outdoor space a flexible and enjoyable outdoor experience.
Accessibility and Proximity to Home
Let’s not forget the practical aspect of caring for your outdoor space. You’ll be visiting your dome regularly, so easy access is a must. Think about the path you’ll take to reach it. Is it a clear, unobstructed route? Will you be able to carry things to your dome without any hassle?
Also, consider how close the dome is to your home. Too close, and you might be dealing with shadows from the building or heat reflected off windows. Too far, and it might become a chore to visit, especially in bad weather.
Striking the right distance means convenience without compromise. It’s about integrating your dome into your daily life, making it a joy, not a burden, to visit.
-
Clear paths for easy access to the dome.
-
Considerate placement to avoid building shadows.
-
Optimal distance for convenience and enjoyment.
Think of your dome as a mini-vacation spot right in your backyard. It should be a pleasure to visit, not a trek through the wilderness (unless that’s your thing, of course).
Strategic Positioning for Climate Control
Your backyard’s microclimate plays a huge role in the well-being of your dome. Wind patterns, for example, can affect temperature regulation. A spot shielded from strong winds by natural barriers like hedges or fences will help maintain a stable environment inside the dome.
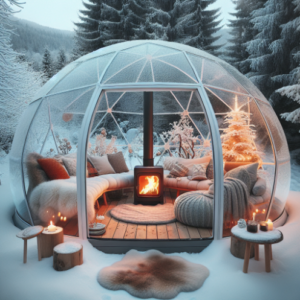
Also, consider the orientation of the dome. Positioning it to face south maximizes sun exposure during winter, keeping the interior cozy when it’s chilly outside. But remember, you’ll need to balance winter sun with summer shade to avoid turning your dome into a sauna!
Every backyard is unique, so take the time to understand your local conditions. It’s like setting the stage for a play—the better the stage, the better the performance of your plants.
-
Protection from strong winds for stable temperatures.
-
South-facing orientation for winter warmth.
-
Balancing sun exposure for year-round comfort.
Imagine your dome as a ship sailing through the seasons. You’re the captain, charting a course that ensures smooth sailing no matter the weather.
Leveraging Natural Elements for Efficiency

Nature offers free resources that can help your dome flourish. For instance, deciduous trees provide shade in summer and allow sunlight through in winter. It’s like having a natural thermostat at your disposal.
Water features nearby can also help regulate the temperature and increase humidity levels. Plus, they add a soothing ambiance to your garden space. It’s about creating an ecosystem where every element supports the others.
By working with nature, not against it, you can create a more sustainable and energy-efficient dome. It’s like being in harmony with a symphony of natural forces, all playing in tune to keep a good balance in your outdoor space.
-
Deciduous trees for natural temperature control.
-
Water features to boost humidity and ambiance.
-
Creating a sustainable ecosystem around you.
Think of your dome as part of a greater orchestra, with each natural element contributing to the symphony of the surroundings.
Site Preparation and Foundation Laying
With the perfect spot chosen, it’s time to roll up your sleeves and prepare the site. This is where your vision starts to take shape, so let’s make sure it has a solid foundation—literally.
Clearing Land and Ensuring Level Ground
Clearing the land is your first task. Remove any debris, rocks, or plants that could interfere with the dome’s foundation. It’s like preparing a blank canvas for your masterpiece.
Next, leveling the ground is crucial. An uneven foundation can lead to structural issues down the line. It’s worth taking the extra time to get this right. Think of it as laying the groundwork for a strong and stable base for your dome.
-
Debris removal for a clean start.
-
Rocks and plant clearance to prevent interference.
-
Leveling for a solid and even foundation.
Imagine setting the stage for a grand performance. Every detail matters, and a level stage is essential for a show-stopping setup.
Choosing Materials for Durability and Sustainability
When selecting materials for your dome’s foundation, durability meets sustainability. Opt for materials that will stand the test of time and weather but also have a minimal environmental impact. Recycled concrete or sustainably sourced wood are excellent choices.
Think about the long-term. A foundation that lasts will save you time, money, and hassle in the future. It’s like investing in a good pair of boots for a long hike—they need to be sturdy and eco-friendly.
-
Recycled materials for an eco-conscious choice.
-
Durability for a long-lasting foundation.
-
Sustainably sourced options to minimize impact.
Building a foundation is like setting down roots. You want them to be deep, strong, and nourishing for the life that will grow above.
Installing Your PolyClear Dome
Now comes the exciting part—installing your PolyClear Dome. This is where your garden starts to come alive, protected and enhanced by its new transparent shield.
Begin by laying out all the components and reviewing the installation instructions. It’s like piecing together a puzzle; every piece has its place, and when they all come together, the picture is complete.
Take your time with the assembly. Rushing could lead to mistakes, and patience here will pay off with a well-constructed dome. It’s like baking a cake—follow the steps carefully, and you’ll be rewarded with something wonderful.
-
Organizing components for a smooth assembly.
-
Thoroughly reviewing instructions to avoid errors.
-
Patience during construction for a perfect outcome.
Imagine unveiling a work of art that you’ve put together with your own hands. That sense of accomplishment will be mirrored in the vibrancy and vitality of your garden dome.
Dome Assembly
Assembling your PolyClear Dome is like putting together a life-sized model kit. Each panel and connector should be handled with care. Start from the base and work your way up, securing each piece according to the manufacturer’s guidelines. It’s a bit like a dance, where every step is choreographed to ensure the structure’s integrity.
Don’t be afraid to ask for help. A second pair of hands can make the process smoother and more enjoyable. Plus, it’s a great way to involve family or friends in creating your outdoor haven. Remember, teamwork makes the dream work, especially when it comes to building your garden sanctuary.
-
Careful handling of each dome component.
-
Following guidelines to ensure structural integrity.
-
Enlisting help for a smoother assembly process.
Watching your dome take shape is a rewarding experience. With each piece that clicks into place, you’re one step closer to the garden of your dreams.
Securing the Dome to its Foundation
Once your dome is assembled, it’s time to anchor it firmly to the foundation. This is a critical step, as a secure dome is a safe dome. Use the recommended anchoring system, whether it’s heavy-duty bolts for a concrete base or sturdy stakes for a softer ground foundation.
Double-check every connection point. A dome that’s properly secured won’t just withstand the elements; it will provide peace of mind. You don’t want your beautiful creation to become a giant windsock at the first strong breeze. It’s about building something that stands firm, just like your commitment to your garden.
-
Using the right anchoring system for your foundation.
-
Double-checking connections for security.
-
Ensuring stability against the elements.
Securing your dome is like fastening a seatbelt. It’s a simple action that provides essential protection for your garden’s journey.
Navigating Zoning Laws and Regulations

Before you get too deep into your outdoor groove, it’s important to understand the legal landscape. Zoning laws and building regulations are there to ensure safety and community harmony, so let’s make sure your dome is on the right side of the law.
Understanding Local Building Codes
Building codes can be as varied as the plants in your garden. Reach out to your local building department to get the lowdown on what’s required for structures like your dome. Some areas may have restrictions on size, height, or placement, while others might be more lenient.
It’s better to be in the know now than to face the headache of having to modify or, heaven forbid, remove your dome later on. Think of this step as doing your homework before the big test—it’s essential for passing with flying colors.
-
Researching local building codes and restrictions.
-
Ensuring your dome meets size, height, and placement regulations.
-
Preventing future legal headaches by being informed.
Understanding the rules is like reading the rules of a board game. It might not be the most thrilling part, but it’s what makes the game playable and enjoyable for everyone.
Permit Process and Compliance
Depending on where you live, you might need a permit to install your dome. This process can seem daunting, but it’s just another step towards your goal. Gather all the necessary documents, drawings, and plans, and submit them to the appropriate authorities.
Stay patient and cooperative throughout the process. Officials are there to help, and compliance is key to a hassle-free garden experience. It’s like getting a passport for international travel—it takes some effort, but it opens up a world of possibilities.
-
Gathering necessary documentation for permits.
-
Submitting plans to local authorities.
-
Maintaining patience and cooperation for compliance.
Securing a permit is like getting a green light on a busy road. It might take a moment, but once you have it, you’re clear to go full speed ahead with your gardening project.
Long-Term Site Maintenance and Upkeep
Your PolyClear Dome is now a proud feature of your backyard, but the journey doesn’t end here. Long-term site maintenance and upkeep are essential to ensure your dome remains a vibrant and productive space.
Regularly check the structure for any signs of wear or damage, especially after extreme weather. It’s like giving your car a tune-up; regular maintenance keeps it running smoothly and extends its life.
Keep the surrounding area tidy and well-groomed. Overgrown vegetation can encroach on your dome, and debris can become a breeding ground for pests. A clean and orderly garden is not only aesthetically pleasing but also healthier for your plants.
-
Inspecting the dome for wear and damage.
-
Conducting regular maintenance for longevity.
-
Keeping the surrounding area clean and tidy.
Maintaining your dome and its site is like caring for a cherished home. It’s a labor of love that pays dividends in the beauty and bounty of your garden.
Seasonal Adjustments and Care
As the seasons change, so should your approach to dome care. In the spring and fall, it’s time for a deep clean and inspection. Check for any cracks or weak spots that need attention before the weather turns.
In the summer, ensure adequate ventilation to prevent overheating. In the winter, check that the structure can handle the weight of snow or the force of winter winds. It’s like dressing appropriately for the weather; your dome needs the right care to match the season.
-
Spring and fall deep cleaning and inspection.
-
Summer ventilation to prevent overheating.
-
Winter checks for structural integrity under snow and wind.
Seasonal care for your dome is like updating your wardrobe for the changing weather. The right care at the right time ensures your garden stays in fashion all year round.
Troubleshooting Common Site Issues
Even the best-laid plans can encounter hiccups. Common site issues like water pooling, pest invasions, or unexpected shading can arise. But don’t worry, these challenges are just opportunities to learn and grow.
Address water pooling by improving drainage around the dome. Combat pests with natural deterrents or barriers. And if new shading issues develop, consider adjusting elements that need more sun. It’s like solving a puzzle; each challenge has a solution.
-
Improving drainage to prevent water pooling.
-
Using natural deterrents for pest control.
-
Adapting to new shading with adjustments.
Troubleshooting is a normal part of outdoor maintenance. Embrace it as a chance to become a more skilled and resourceful in caring for your space. After all, overcoming obstacles is what makes the experience even sweeter.
Key Takeaways
There you have it, a comprehensive guide to selecting the perfect site for your PolyClear Dome. From evaluating sunlight and soil to navigating zoning laws and maintaining your site, each step is important in creating a thriving outdoor space.
Remember, the journey doesn’t end with installation. Your dome is a living, evolving space that requires care and attention. But the rewards— a serene retreat, a place to unwind, or even fresh produce —are well worth the effort.
So, go ahead, choose your spot, prepare your site, and enjoy the fruits of your labor. Your backyard dome adventure awaits!
FAQs: PolyClear Dome Site Selection
Got more questions about choosing the right spot for your PolyClear Dome? Here are some quick answers to help you on your way.
What are the most critical factors to consider when choosing a site for a PolyClear Dome?
When selecting a site for your dome, consider sunlight exposure, soil conditions, ease of access, proximity to your home, and protection from strong winds. Also, ensure the site complies with local zoning laws and building codes.
How does terrain affect the placement and stability of a PolyClear Dome?
Flat or gently sloping terrain is ideal for dome placement, as it ensures stability and proper drainage. Steep slopes can pose challenges for installation and may require additional structural support.
Can I install a PolyClear Dome without professional assistance?
Many PolyClear Domes are designed for DIY installation, but it’s important to follow the manufacturer’s instructions carefully. For larger or more complex domes, professional assistance may be beneficial.
What are the local zoning considerations I should be aware of?
Local zoning considerations may include restrictions on structure size, height, placement, and the need for permits. Contact your local building department for specific regulations in your area.
Choosing the right site for your PolyClear Dome is a crucial step towards creating a sustainable, efficient, and beautiful garden space. By following this guide, you’ll be well on your way to enjoying the benefits of your dome in no time. Happy creating!
Seasonal Adjustments and Care
With the changing seasons, your PolyClear Dome needs a little extra TLC. In the spring, it’s time to roll up your sleeves for a thorough clean. Clear any debris that winter left behind and inspect the structure for any damage that could compromise your dome’s integrity. It’s like prepping your home for guests; you want it to be spotless and sturdy.
When summer hits, your dome can become a hot spot—literally. To keep everything in good condition, ensure your ventilation system is working efficiently. Think of it as your dome’s personal cooling system, maintaining comfort even when the sun is blazing.
As autumn rolls in, it’s time to prep for the cooler months. This might mean adding insulation or adjusting the position of items to capture the waning sunlight. It’s like giving your dome a cozy setup.
Winter demands its own set of adjustments. Heavy snow can put a strain on your dome, so keep an eye on the accumulation and gently remove any excess. It’s a bit like brushing snow off your car; a little effort can prevent a lot of trouble.
-
Spring cleaning to remove debris and inspect for damage.
-
Summer ventilation to keep temperatures down.
-
Autumn preparations for the cold, including insulation and items repositioning.
-
Winter vigilance to manage snow load and maintain structure integrity.
Troubleshooting Common Site Issues
Even the most idyllic gardens face challenges, and your PolyClear Dome is no exception. Water pooling around the base can lead to problems, so consider installing French drains or adjusting the landscape to promote runoff. It’s like giving water an escape route so it doesn’t linger and cause issues.
Pests can also be a nuisance, but before you reach for harsh chemicals, try natural solutions. Companion planting or introducing beneficial insects can help keep the bad bugs at bay. It’s like having your own garden security team, but all-natural.
Unexpected shading can occur as trees grow or new structures are built. If your dome starts to get too much shade, you may need to relocate your dome. It’s a bit like rearranging the furniture to make sure everything fits just right.
-
Installing drainage solutions for water pooling.
-
Implementing natural pest control strategies.
-
Adjusting to new shading patterns through relocation.
Key Takeaways
Here’s a recap of what we’ve covered to ensure your PolyClear Dome is a success:
-
Choose a level, accessible spot with the right balance of sunlight and shade.
-
Understand your soil and terrain to provide a strong foundation.
-
Keep local zoning laws and building codes in mind to avoid legal issues.
-
Maintain and adjust your dome with the seasons for optimal overall well-being.
-
Stay vigilant and proactive in troubleshooting common garden and site issues.
By keeping these key points in mind, you’ll be well-equipped to create a flourishing space within your PolyClear Dome, providing you with joy and bounty throughout the year.